Saturday, May 13, 2017

Covering Tire Wheels ...

By far the easiest thing ... putting thick plywood over the tire wheel frames! I am so excited to see all these things finally coning together! Just ... WOW!


Caption: The floor to the vanity is in and now I can dry fit the sink. The little wall in the back needs to come up much higher, this will probably get changed in the near future!


Caption: Here's a better look at the cubicle thingy. It's fitted between two studs, NO that wasn't planned! And then attached to the studs.


Caption: This is the shower seat ... and the bedroom closet is on the other side. I didn't think ahead and design the shower to a premade shower pan, soooooo we're going to have to fashion one of our own 😖 be sure to think ahead, because this is going to be a nightmare trying to fiberglass our own shower pan.


Caption: This is the closet floor in the toilet room.


Caption: See how little space that cubicle takes up? We have a HUGE closet space!


Caption: Got the new flooring in, trying to make sure turtle dove likes it before committing ... YEP! LOVE LOVE LOVE IT!!

Happy RV'ing!!


Friday, May 12, 2017

More Helpers, More Walls!

After Madisen kicked my butt into gear, we got two new helpers today!!! We got those walls knocked out in no time and it helped having a guy around to do the pop rivets! Madisen said she wasn't doing them today ROFL!

I have the bestest family every! I even made sure everyone that helped out signed a wall!


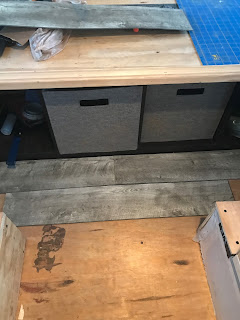
Caption: We inserted one of those two square storage cubicles ... this will give two drawers for the vanity area! It took up just a small amount of the closet, no big loss!


After a long day of building walls, it's dinner time!! First meal on Freedom! Sitting on the floor, enjoying wienerschnitzel. YUM!


 Thank you to my very special helpers!! Love y'all!!

Happy RV'ing!

Thursday, May 11, 2017

What Is That? It's WALLS!

I finally got my youngest daughter, Madisen to come over and help ... with Midget Gidget! We decided to try out a wall ... I looked and looked through 100s of other blogs and ideas on how others did their skoolies and I decided on my own way ... making use of the metal track for metal 2x4s ... I attached the wooden walls, to the metal track. The track is held in place using pop rivets ... boy! was that fun!! NOT!


Thanks for kicking me in the butt and getting these walls up!! Can you believe we've NEVER built walls before??

Happy RV'ing!!

Thursday, May 4, 2017

It's Power Time!

So Daddy 💕 finally made it home for a few days and get's to work on the power for Freedom. Since we didn't take out the side walls, we have no real way of getting power inside the walls. Oh sure, we could drill holes and fish the wire in but Daddy 💕 was worried about hooking something we didn't need to and messing up the lights. That, and I truly wanted the look of the conduit running down the walls ...

We used a residential power box ... with a breaker for each section and each side of the bus. We wanted to make sure that we didn't get locked into ... "you can only use one plug at a time" 😁 we also decided that not all the plugs would be towards the floor. We knew that cabinets would be going in and needed power at the counter top level!

Power Stats:
Coming soon!


Caption: this is the kitchen area on the drivers side of the bus. Each outlet box has it's own set of wiring!


Caption: this outlet box is for the A/C unit we will be putting in. We decided on portable 18,000 BTU units to try and keep the bus cool in West Texas heat.


Look at that handsome man!!! That's my Daddy 💕 getting the wiring all done!!


Happy RV'ing!!


Pony Wall Update, First Coat of Paint

We eventually moved Freedom into the barn, to just make sure she didn't get rained on. This got me out of the sun and more able to work....